"I am a Spotify Premium user, and I use it on 3 devices, however, only one device appears in 'offline devices' in my account. How do I use another device for offline listening? In particular, how can I save songs in my Ubuntu desktop?"
Spotify, as the most popular streaming music services all around the world, it allows you to stream music on cross-platform including Windows, Mac, Linux, Android, iOS and more. Compared to Spotify web player, the desktop app is provided with additional features like downloading music for offline listening, uploading local music to Spotify or syncing Spotify music to iPhone, Android or other more portable devices.
Ubuntu, as one of the Linux distributions, is the most popular free and open source operating system. Compared to Windows and Mac, people may prefer to Ubuntu Linux as daily use OS, because the Ubuntu desktop is easy to use (no need to buy costly hardware for the basic need), easy to install and includes everything (comes with OpenOffice preinstalled) you need to run for home or enterprise use. It's also open source, secure (free from Viruses and Pirated software), accessible and free to download.
And in this article, we would like to show you the best two ways to quickly install Spotify in Ubuntu operating system and the way to download Spotify music to Ubuntu for offline enjoying.
Part 1: How to Quickly Install Spotify Desktop App in Ubuntu?
Part 2: How to Extract Music Files from Prime Music and Music Unlimited
Here we will share you the best 2 ways to install Spotify desktop application in Ubuntu with ease.
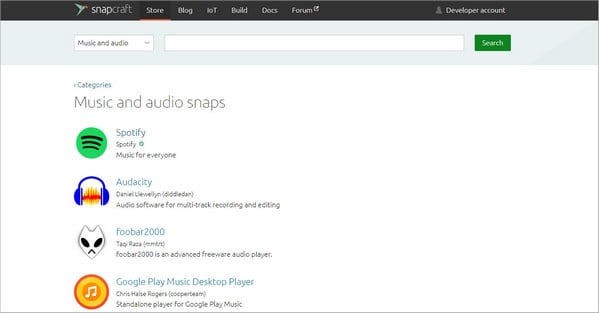
Snap application packages of software are self-contained and work across a range of Linux distributions, and fortunately, Spotify has released a Snap package recently, so that you can install Spotify in Ubuntu easily. For Ubuntu 16.04 and 18.04 users, they can go to the Software Center where the Snap package is available and then install Spotify directly.
For the users whose system has no Snap package, they can install Spotify desktop by using the command line:
sudo apt-get install snapd
Then you can install Spotify Snap app using this command:
sudo snap install spotify
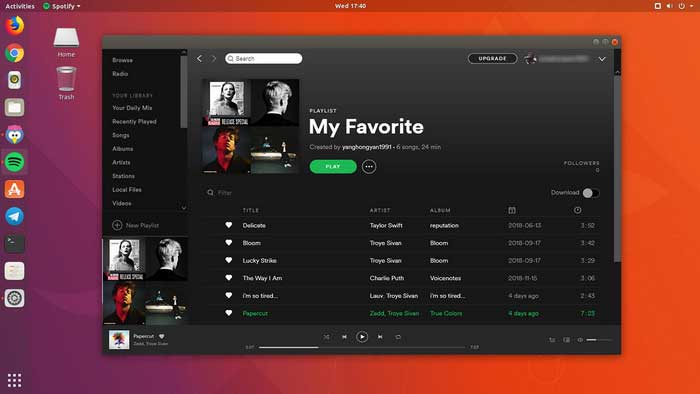
Once the Spotify desktop installed successfully, you can find it in the application menu. And you will need to log in your Spotify account when the first time you launch it.

Because the desktop client of Spotify is only available for Windows and Mac operating system, in order to install the Spotify desktop client in Ubuntu, you need to open a terminal (Ctrl+Alt+T) and enter the commands below to add the repository in the sources list of the software:
sudo sh -c 'echo "deb http://repository.spotify.com stable non-free"<< /etc/apt/sources.list.d/spotify.list'
Enter the commands below to add the GPG key:
sudo apt-key adv --keyserver keyserver.ubuntu.com --recv-keys 0DF731E45CE24F27EEEB1450EFDC8610341D9410
Then Update and install Spotify client by entering the command below. Once the installation completed, you can start Spotify by searching for it in Ubuntu Unity Dash.
sudo apt-get update

      sudo apt-get install spotify-client
These are the best 2 ways you can use to quickly install Spotify desktop in Ubuntu or other Linux distributions. It is very easy to operate and you can start now to stream Spotify music in Ubuntu with ease.
Due to the technical or performance issue, you may not want to install Spotify desktop in Ubuntu, so here we share you guys an alternative way to get the downloaded Spotify music to Ubuntu. You can use Sidify Music Converter to download song, playlist or album from Spotify to plain audio formats including MP3, AAC, FLAC or WAV, then sync or share the downloaded music from Windows/Mac with Ubuntu. In the following tutorial, we will show you how to download and sync Spotify music to Ubuntu.

If you want a tool to convert any streaming music (including Spotify, Apple Music, Amazon Music, Tidal, Deezer, YouTube, YouTube Music, SoundCloud, DailyMotion …) to MP3, Sidify All-In-One is the go-to choice.
For Mac users, please refer to How to Download Spotify Playlists on Mac.
Step 1Download and install Sidify Music Converter
Download and install Sidify Music Converter on Windows or Mac, then launch this application on your desktop. And choose a conversion from Spotify App or Spotify Webplayer. (>> App Mode vs Webplayer Mode)
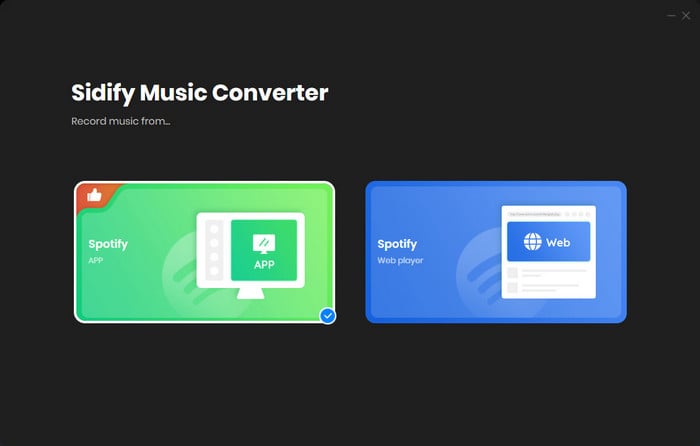
Select the Spotify App mode to access the modern interface of Sidify as below. Spotify music app will be launched automatically.
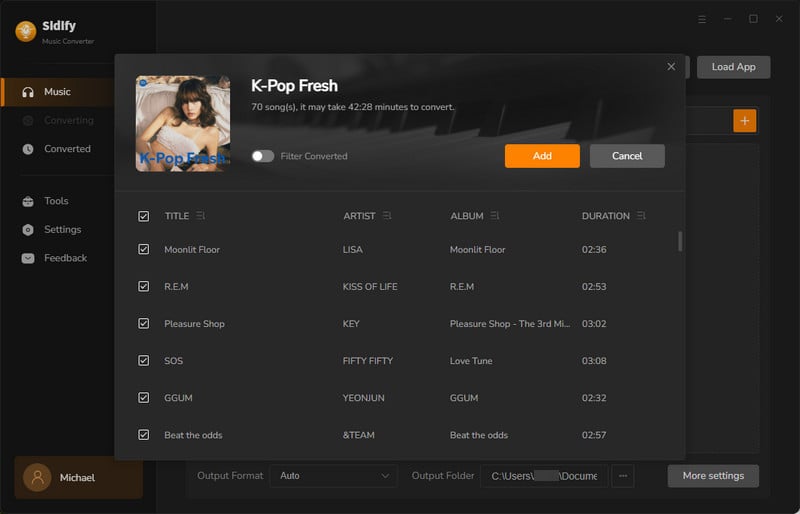
Step 2Add Spotify Song or Playlist
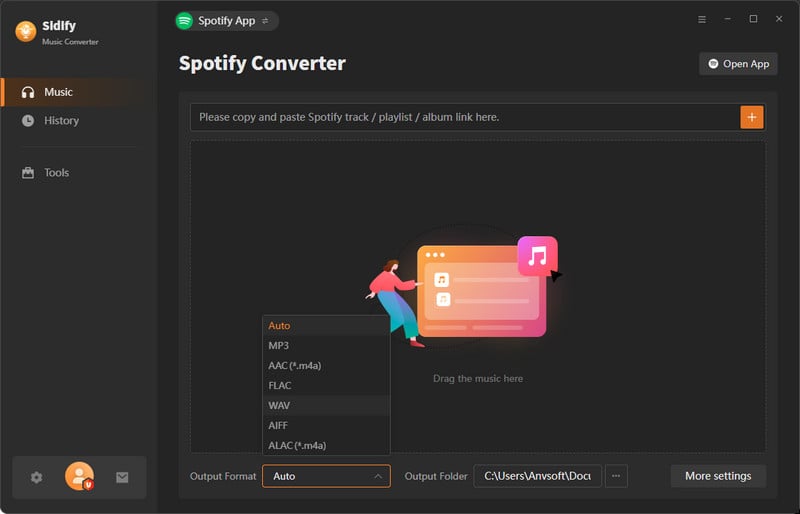
To add song or playlist of Spotify to Sidify Music Converter, just click on ![]() button and then drag & drop a song, playlist or album from Spotify to Sidify adding window.
button and then drag & drop a song, playlist or album from Spotify to Sidify adding window.
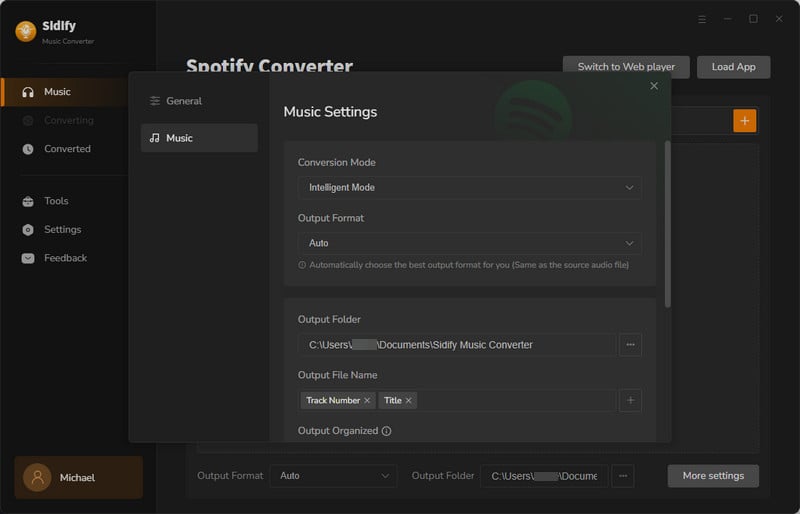
Step 3Customize the Output Settings
Then click on ![]() button to customize the basic setting parameters including output format, output quality, conversion mode, output path and more. Sidify supports downloading Spotify music as MP3, AAC, FLAC, WAV, AIFF or ALAC with different audio quality including 320kbps, 256kbps, 192kbps, or 128kbps. In the output settings, you could change the output folder as required. If you needn't to change output path, the output audio files will be saved under the default folder.
button to customize the basic setting parameters including output format, output quality, conversion mode, output path and more. Sidify supports downloading Spotify music as MP3, AAC, FLAC, WAV, AIFF or ALAC with different audio quality including 320kbps, 256kbps, 192kbps, or 128kbps. In the output settings, you could change the output folder as required. If you needn't to change output path, the output audio files will be saved under the default folder.
Sidify also supports saving the output audio into Artist, Album, Artist/Album or Album/Artist folder for better organize music library.
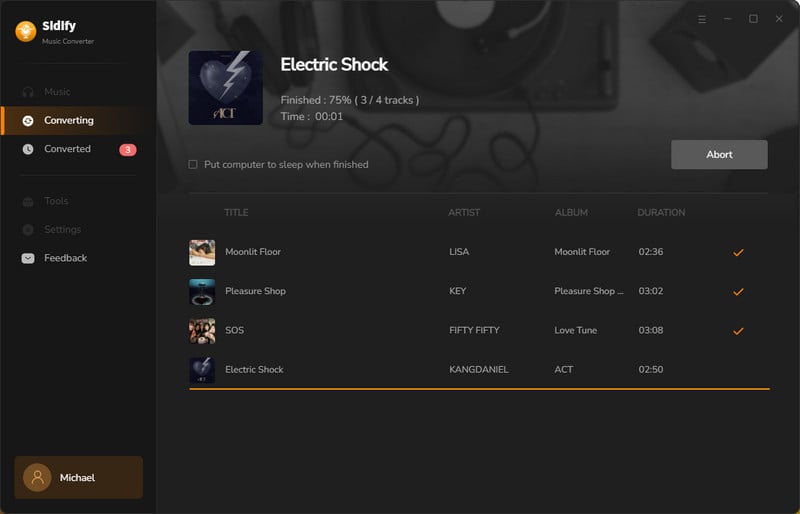
Step 4Start the Download
Now, you can press Convert button to start downloading songs, playlists or albums from Spotify to MP3, AAC, FLAC, WAV, AIFF or ALAC. Sidify will download music at faster speed with the ID3 tags including title, cover, artist, album, track number preserved.
After the conversion is done, you can find the converted audios by clicking on "Converted" button.
Step 5Migrate the Downloaded Spotify Music from PC to Ubuntu
The simplest way to migrate songs from Windows PC to Ubuntu is by using Dropbox: uploading the music files you downloaded from Spotify to Dropbox cloud drive on Windows PC, then access it in Ubuntu with the same account to download the music you uploaded.
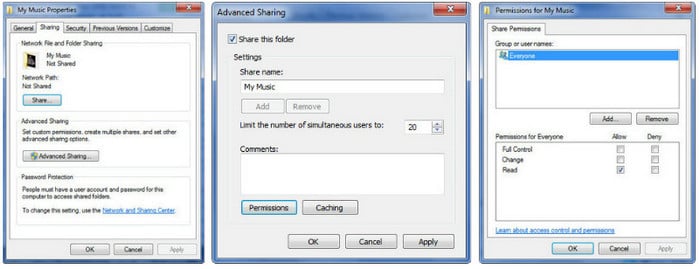
Or if you want listen to the music on Ubuntu machine, you can share the folder you save the Spotify music from your Windows PC and access the share on Ubuntu.
1. Go to the folder, then right-click it and select "Properties". Click on "Advanced Sharing" and then click "Share this folder", and under permissions, select "Everyone" and choose read access.
2. On Ubuntu machine, browse the network and locate your Windows machine, and you should see the shared folder.
For music lovers, Spotify is one of the best ways to stream music online or download music for offline listening. It is also the best music player for those who want to listen to music on machine running Linux or its distributions operating system. If you have an Ubuntu or other Linux machine, you can try the 2 ways above to install Spotify desktop, or use Sidify Music Converter to download Spotify music to local drive and sync it to Ubuntu.